Tagged: half-rectangle triangles
Quilt pattern: Fanfold
I am over-the-moon, beside-myself excited that my quilt, Fanfold, is featured on the cover of the 2021 QuiltCon Magazine. WOW!!!

The pattern for Fanfold is one of 10 in this year’s magazine. This is the second time I’ve had a pattern in QuiltCon Magazine; the last time was Flight Pattern in 2020. I’m so grateful to have the opportunity to contribute to the magazine once again! The editorial team are fantastic to work with, and it’s such a privilege to be able to share my work with other modern quilters around the world. I’m so chuffed!!
Fanfold is a simple but striking design that came from Sunday sketch #4, which I posted waaaay back in July 2016. At the time, I had been quilting for less than 2 years, and I still wasn’t super-confident. My designs followed my skills, so they featured a lot of squares and triangles. (The first time I posted a design using curves was two years and more than 100 sketches later!)
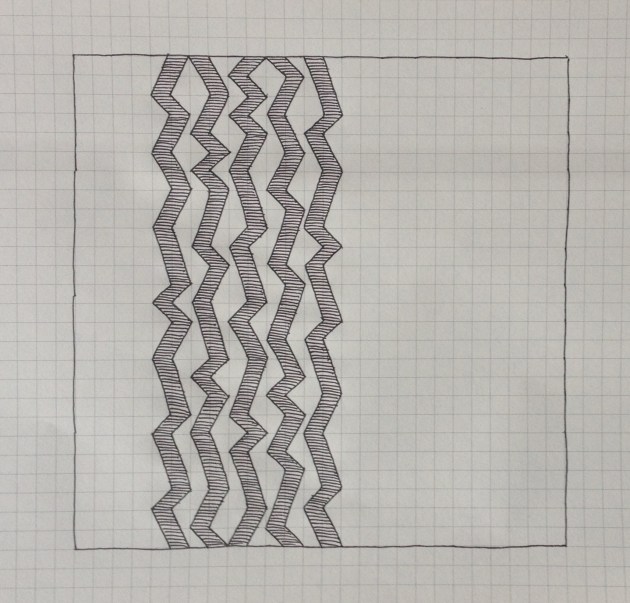
You can see that I reworked the design slightly for submission to QuiltCon Magazine. I kept the overall shape of the zig-zagged columns. I kept the spacing, so that adjacent columns never actually touch. And I kept the off-set placement of the zig-zags in the overall frame. But I flipped the whole thing around, so the zig-zags are on the right of the frame. And I added another column. And – most importantly – I added dimensionality to the columns by using two colours instead of one; the zigs (ha!) are coloured one way, and the zags another.
Here’s how I re-drew the design in ElectricQuilt 8, adding colour:

The design was actually super-easy to make. The quilt top came together so fast! The shapes are made from half-square triangles and two types of half-rectangle triangles (2:1 and 3:1). Probably the longest part was just figuring out how many I needed of each colour. Then I cut, chain-pieced, pressed, trimmed using my Bloc-Loc rulers (lifesavers!), pieced into columns, added large pieces of background fabric, and ta-da! Finished quilt top!
I used Kona Cotton Solids (my favourite) in Carrot, Primrose and White. But one of the great things about this design is that you could make it in any colour for the background, with another 2 colours (or 1 colour plus white) for the zig-zags. Lots of opportunity for personalisation!
Fanfold was custom quilted by Valerie Cooper from Sweet Gum Quilting. There’s no way that my own quilting would’ve been good enough to get this quilt on the cover of a magazine, so I’m very grateful for Valerie’s work! I am all about focusing on my strengths and outsourcing the other stuff to people more skilled than me.
I did learn one new skill with this quilt though. I ended up adding a faced binding, rather than my usual standard binding. It was a bit stressful, as I’d never done one before, but I found tutorials from the Silly BooDilly and Cotton & Bourbon super-helpful (just don’t combine them… ask me how I know). Facing really does give a different look to finished quilts, one that’s probably more suited to a ‘show’ quilt. It also worked well with this quilt, as it meant that the zig-zags could run to the very edge of the quilt without being cut off by the binding.
If you’d like to see more of Fanfold, or make the quilt yourself, you can buy the digital edition of the 2021 QuiltCon Magazine on the Quilting Daily website. Print issues will be available closer to QuiltCon Together (Feb 18-22).
If you make Fanfold, let me know! I’d love to see pics! Send me an email or tag me on Instagram (or both, since I don’t always see all notifications).
And if you haven’t already, I hope you’ll register for QuiltCon Together. I’m excited about being able to take part in workshops and lectures from Australia. I hope to get to QuiltCon one of these days, but not this year. Let’s all stay home and stay safe!
Sunday sketch #217
When I sit down to sketch (on paper or in EQ8), unless I have something specific in mind, I’ll often start by playing with old favourites – like a star, or some triangles, or maybe even some curves. It’s like a warm-up, to get my brain thinking about shapes and colours.
This week’s series of sketches came from a star block. But I’m not going to show you the original star block I came up with. Why not? Because it’s boring!
One of the advantages of using Electric Quilt 8 for designing quilts is how easily you can manipulate single blocks. Often I’ll design a block that’s a bit meh, but rotating it, flipping it, or colouring it differently can create something way more interesting. Those sorts of manipulations are much more time-consuming (and paper-consuming!) to do with my gel pen and dot pad.
So I’ll walk you through a bunch of designs that came out of the original boring star block. The boring star block was created from 4 copies of a single mini-block, and it’s this mini-block that I’ve manipulated to create a bunch of new designs.
Here’s the first one. The block is laid out in a 6 x 6 grid, with the blocks all facing the same direction. The two-colour palette (not counting white) helps you to differentiate the single blocks.

Still facing the same direction, but now the pink blocks are in a reverse colourway – the pink and white are switched. It’s a small change but it definitely gives the two designs a slightly different feel.

Switching back to a single colour (black) subtly changes the design again. This one makes me think of sprigs of vegetation out in the desert.

Rotating the blocks introduces a new variation. In the design below, the blocks are rotated 90 degrees with respect to their neighbours. The alternating colours help to create some new shapes and movement.

Adding in a third colour (and a border, just for fun) helps to distinguish those spiky internal shapes from the angled border shapes. The blue and pink shapes now feel like two interconnected webs, controlling those spiky black shapes (which have 8 ‘legs’!).

Or the black shapes can come to the foreground, by colouring in the squares that have thus far remained hidden. This also streamlines the blue and pink border shapes, which actually helps to refine its movement (to my mind, anyway).

We can thicken up the blue and pink by switching out the border shapes for the spiky-background shapes instead. We can still see the diagonal movement of the colours, but we get to see more of the colours too.

You can get a better idea of where those squares came from (and how they contribute to the actual construction of a quilt from this design) if we colour them differently. I think this design might be my favourite of this series.

Or switch blue to white, and add a coloured border to make the pink feel like it’s a background rather than a foreground colour.

You could embrace white as a background colour, and use chunky rinds of colour to separate the black spikes.

Or take the focus off the black spikes altogether.

But I kinda like the spikes, so here they’re the focus again. This pared-back design doesn’t need any half-rectangle triangles like the other designs – they could be replaced with solid rectangles here. Much quicker and easier! I think this version would look great in a scrappy palette or a limited palette with scrappy fabrics.

Using a single colour can help to show the construction of a single block. There’s so much going on in this version that I think it needs a super-limited palette to not be too overwhelming (for me, anyway).

And, last but not least, a totally different version that just goes to show the versatility (and serendipity) you can create by changing only block rotation and colour placement.

This is just the tip of the iceberg; I have so many more variations of this design that I haven’t shared here. I just wanted to show how easy it is to make large changes to an overall design by tweaking little bits along the way.
So, each block is constructed using two squares, two half-rectangle triangles, one half-square triangle, and two triangle-in-a-square units. Depending on your colour placement though, you might not need some of these units.
Sunday sketch #213
I’m pretty sure I once said that the half-square triangle was my favourite quilt shape. But I think I’m changing my mind. I am loving half-rectangle triangles at the moment!

I feel like half-rectangle triangles just have more energy somehow. That sharper angle just gives it a more zig-zaggy zing somehow. OK, that sounds a bit wacky. But hopefully you know what I mean 🙂
The motif in this design – which is a bit like a bolt of electricity crossing the page* – has sooooo much potential. I created a bunch of designs along this theme, but these ones were some of my favourites.
* I say ‘page’, because I started off sketching this on paper, before moving over to EQ8 to speed things along.
Anyway, here are some more designs along the same theme. First up – the zig-zags arranged horizontally, in a limited colour palette.

Or arranged in a cascade. The design on the left follows a regular pattern in only two colours, while the one on the right has a more irregular pattern and an expanded palette of four colours. Funny how just a few small changes can make such a big difference!


Or back to the original, simplest version, with a vertical rather than a horizontal orientation. I probably should’ve put a border around this one to make it clearer against the white background of this webpage, but you get the gist.

These designs can be translated into quilt patterns using HRTs, HRTs and more HRTs! And some rectangles and/or long strips, too.
