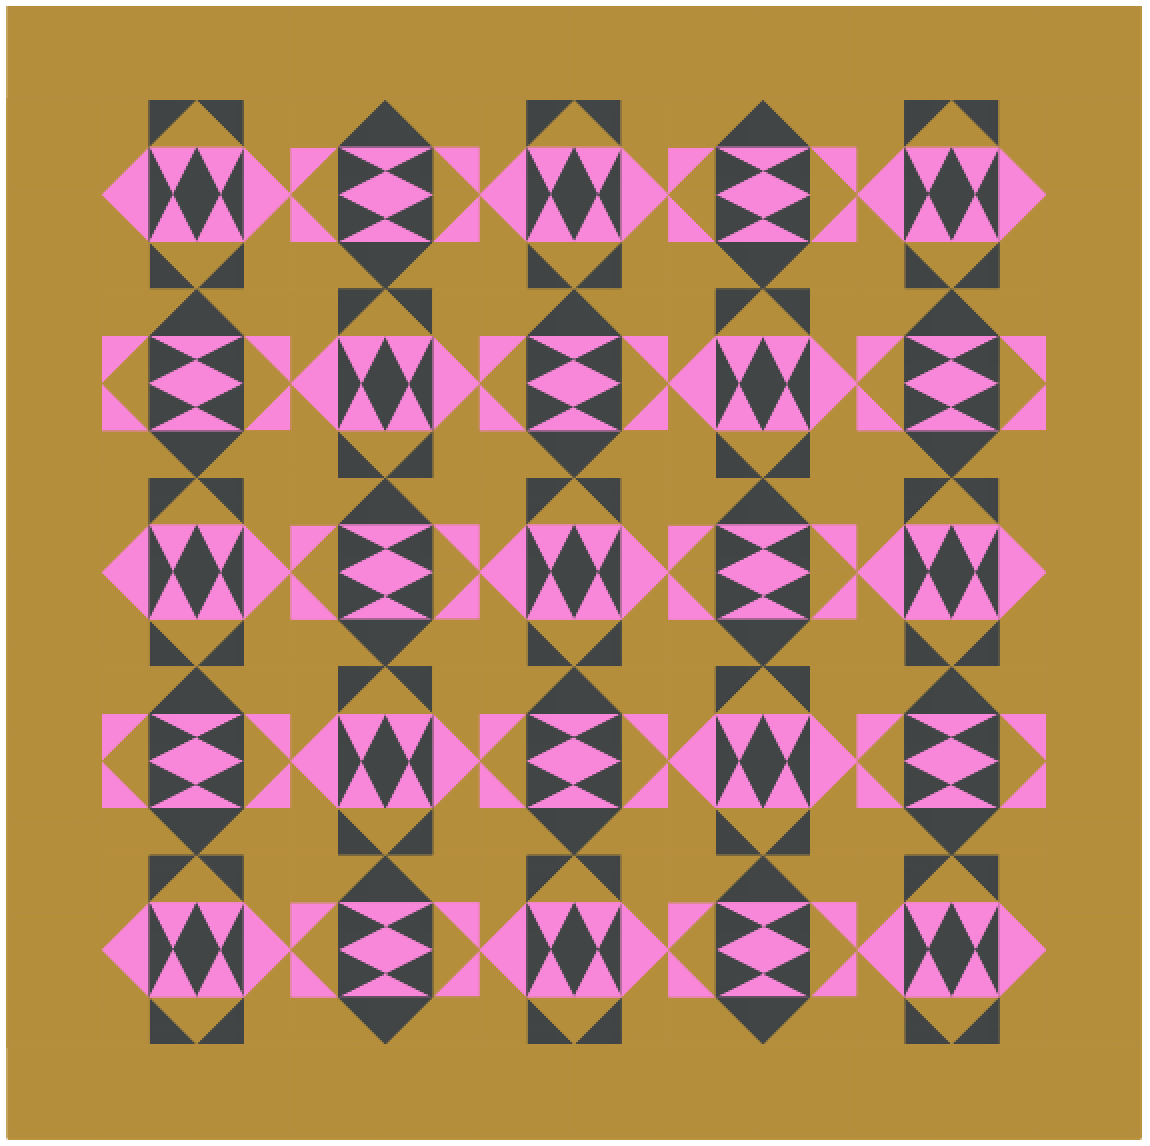
Finished quilt: Moonshot
I set myself a few loose goals in 2024, one of which was to submit work to a category at QuiltCon that I’d never entered before. There were quite a few to choose from: Improvisation, Appliqué, Small Quilts, Handwork, Group or Bee Quilts, and the Windham Fabric Challenge. (And the Youth category, but I’ve missed my chance with that one 🙂 )
Meet Moonshot, my first-ever submission to the Fabric Challenge category at QuiltCon.

The QuiltCon Fabric Challenge is one of two challenge categories in the Modern Quilt Guild’s annual modern quilt show. The challenge is to make a quilt using at least 3 of 6 pre-selected fabrics, which in recent years have been curated by the show’s featured lecturer from the Ruby + Bee Solids collection from Windham Fabrics. This year’s featured lecturer is Tara Faughnan, who chose (clockwise from top left): Unicorn, Turmeric, Poppy, Rain Cloud, Slate and Stormy.


I’d never participated in the Fabric Challenge for a few reasons. It’s often difficult to find Windham Fabrics (and the specific colours chosen for the challenge) here in Australia. Postage from the USA or elsewhere can be prohibitive, too. Also, the challenges are announced kinda late in the year (end of April or early May, I think?), which doesn’t leave a huge amount of time for ordering fabrics and making the quilt (which for me includes outsourcing quilting) before the October 31 submission deadline. OK, in hindsight, 5 months seems like it should be more than enough time, but I dunno… the timing has discouraged me in the past.
And, to be honest, I haven’t always loved the selected colours or come up with a suitable design. But this year’s selection was right up my alley – the pink? and the turmeric? with red? and a not-quite-black? Yeah!!!
I scoured my Sunday sketches for a design that could work in 3 or 4 of these colours, and mocked up a few different things….

…and although some of them worked fairly well in these colours, I wasn’t wowed by any of them. Time to try something new.
But first, I ordered some yardage. I wasn’t even sure which colours I’d use or how much I’d need, so I ended up ordering all but the Rain Cloud and a few yards of each. I’d decided to use the Turmeric as my background fabric, so I ordered a bit more of that one.
In the end, I went with a design I’d come up with a few months before.

(You might recognise it; I posted a modified version as Sunday sketch #441 in early December.)
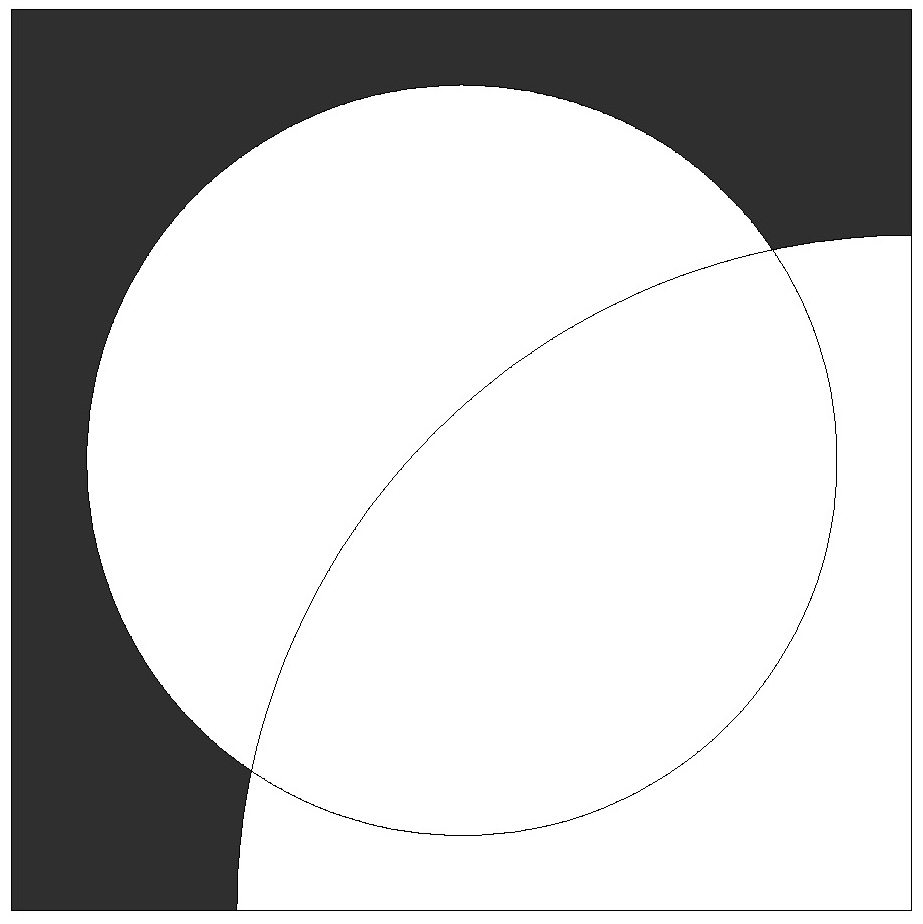
This design is a bit unusual for me, because it’s based on a shape that I had never sewn before and (at the time) wasn’t sure how to construct. It’s just ‘standard’ curves – a circle and a quarter-circle – but they overlap. I’m no expert at sewing curves, so I really wasn’t convinced that this was something I could tackle. Great Sunday sketch, but possibly not something I’d ever actually make.
But… remember those loose goals I mentioned? Another goal for 2024 was to try something new in terms of sewing/quilting skills. I’ve definitely got my favourite types of quilts to make, and I don’t often venture outside that comfort zone. But the previous year, I’d tried raw-edge appliqué for the first time for Unblocked (after swearing I’d never use it) and really liked the end result. It was also much easier than I’d anticipated. So I decided that I needed to try the overlapping curves. How hard could it be? 🙂
First, I had to decide on a layout and a colour palette. The design uses 4 colours, but which 4? It wasn’t until I received my order of fabrics that I settled on the Turmeric, Slate, Stormy and Poppy. I absolutely loved the pink (Unicorn), but ultimately felt that it just didn’t work in the design the way I wanted it to. (As an aside: It was the first time I’d used Ruby + Bee fabrics, but I definitely will again; the drape and feel are lovely, and the colours are gorgeous.)
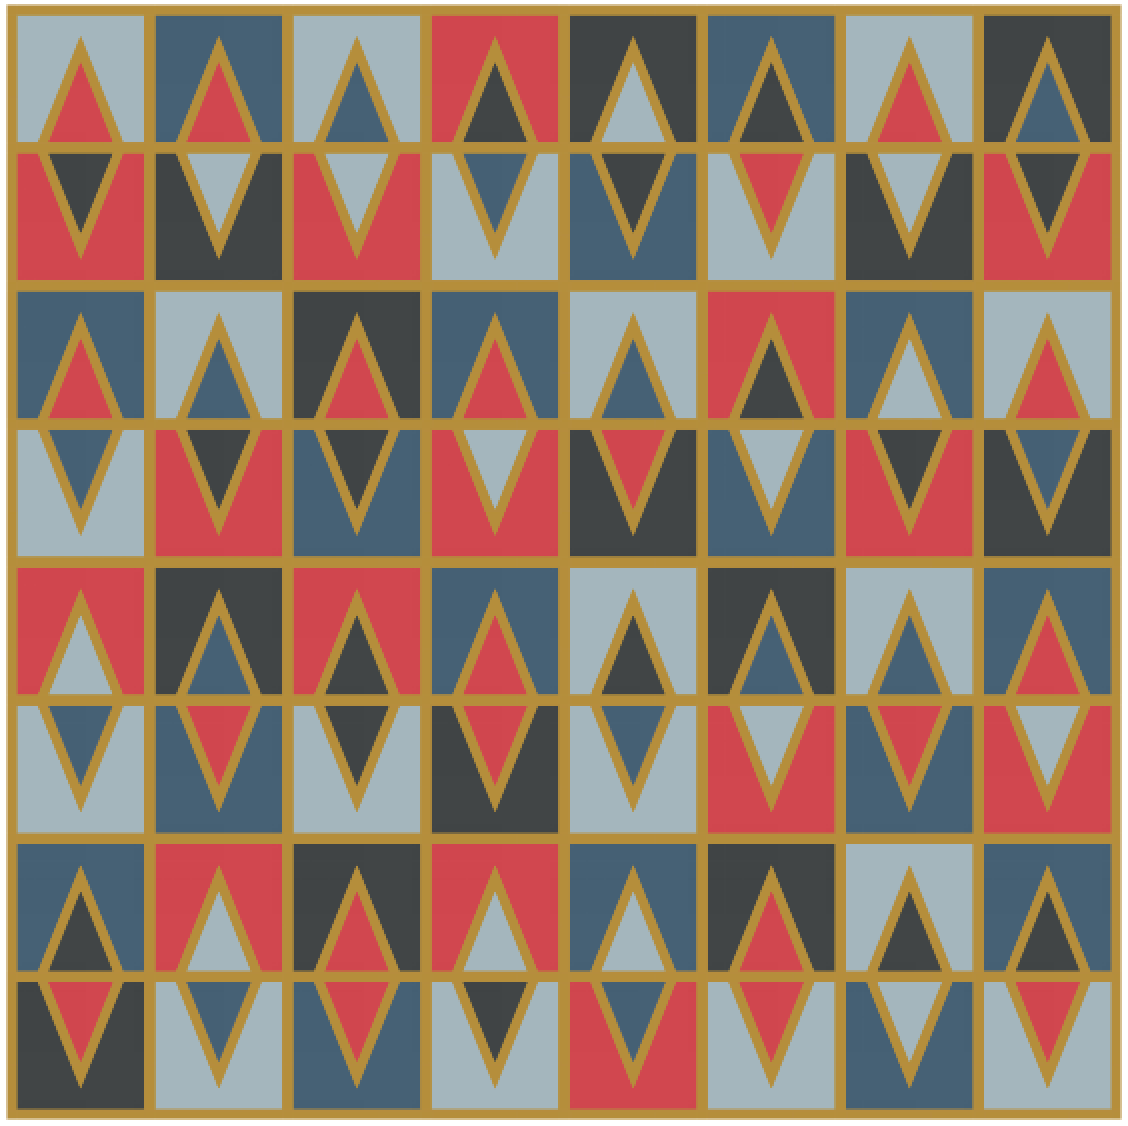
With the palette finalised, I then had to settle on a layout. With a 4 × 4 layout of blocks that each contain 4 colours, I had a lot of permutations to choose from (24 in total: 4 × 3 × 2 × 1). I even went so far as to print out every single block colouring so I could cut them out and move them around to find the best layout (yes, really!).

Every single possible block variation using the four fabrics I’d selected
Each block has 4 parts: the 2 pieces that make the outer part of the block, and the 2 pieces that make the inner part, the circle:


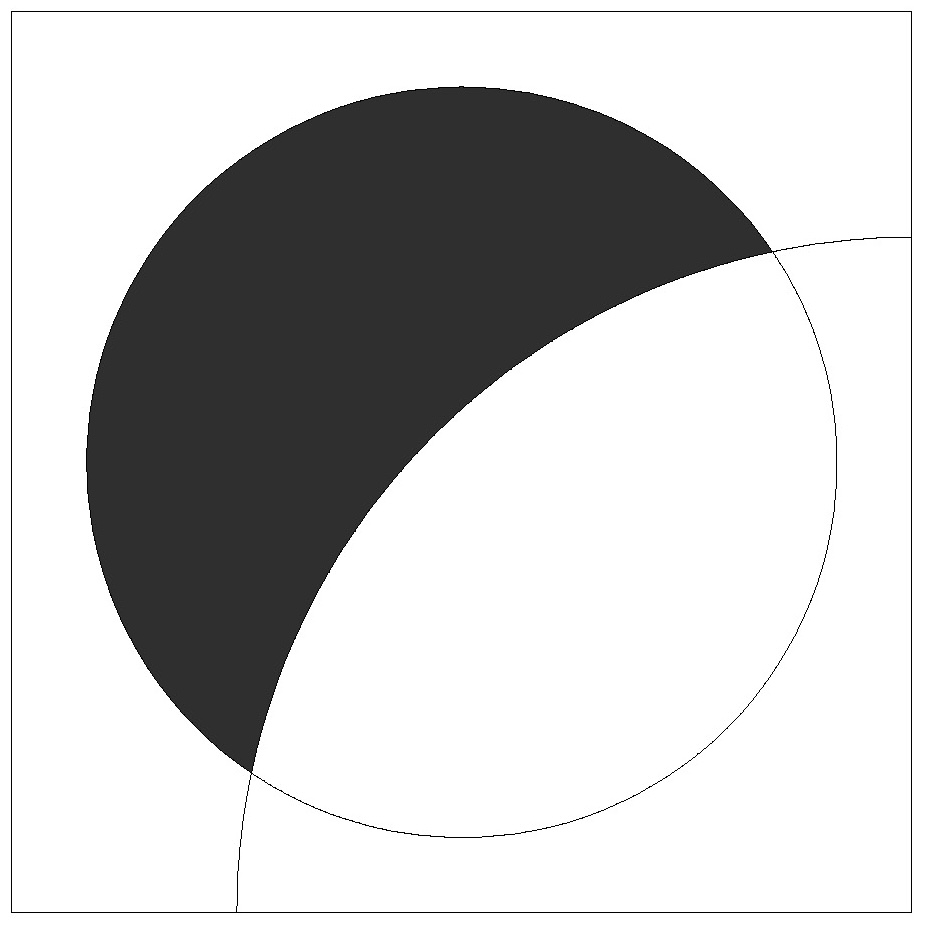
I wanted to arrange the blocks so that each piece appeared in each colour only once in each row or column. I didn’t want any colour/shape pairing to repeat. Which is easier said than done! If you look at the original design, above, you can see that I didn’t achieve it there. For example, in the bottom row, two of the blocks have the same red shape (in columns 1 and 3); the largest outside shape doesn’t appear in red in that row. Instead, it appears in white twice (in columns 2 and 4). There might be other places in that version where shape/colour combinations repeat. (I tend to start colouring at the top of a design, so any mistakes/problems usually end up towards the bottom haha!)
It took me awhile (and a lot of little block printouts), but I finally found a layout that satisfied all my colouring rules. But I still hadn’t settled on the final colour placement… that is, what colours I actually put in each position. I already knew that I wanted to add a background/border, but in which colour? The blog post for Sunday sketch #441 shows how changing the colour of the border changes the overall look and feel of the design.
I mocked up all 24 possible versions in Electric Quilt 8, then spent ages (aaaaaaaages) looking at every single one and deciding which I preferred. If I had to decide today, I bet I’d choose a different one. But in the end, I went with this one.

So, I had my fabrics, I had my design, now all I had to do is make it!
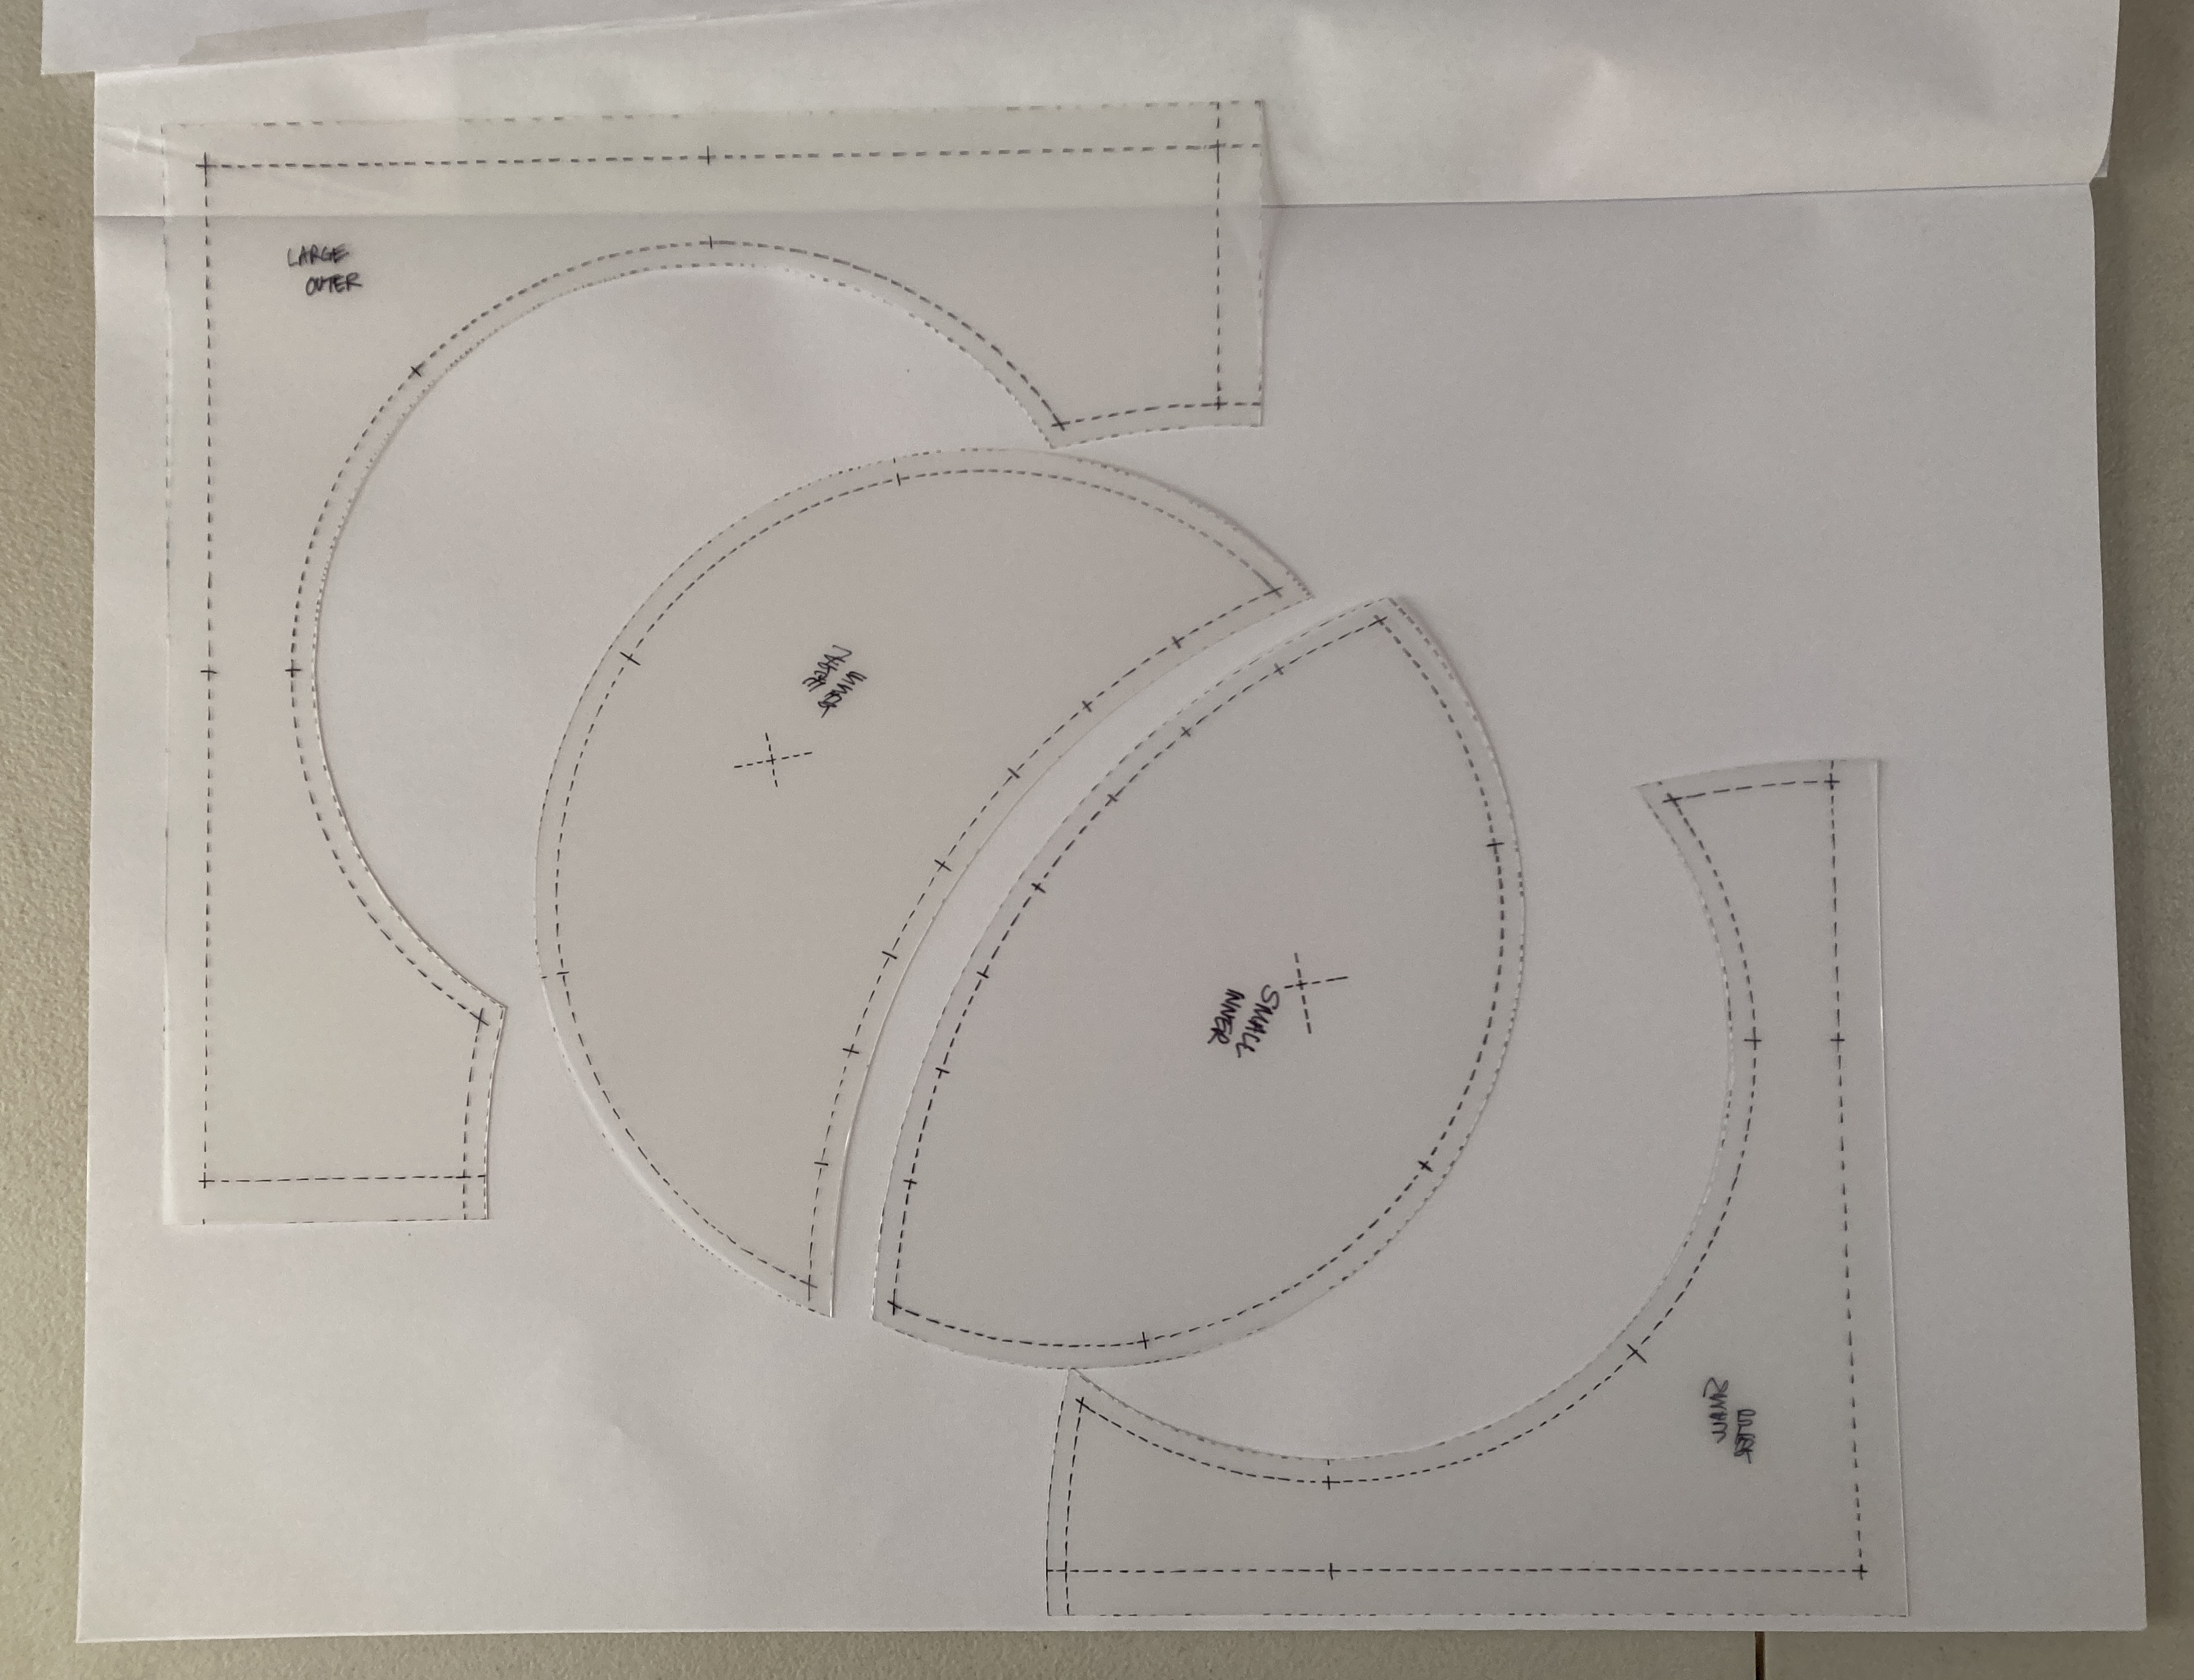
I knew I’d need templates to cut the pieces for each block. First, I drew the block design on a large sheet of paper (each block is 12.5″ unfinished) and added the seam allowances to each of the 4 pieces in the block. I added extra space around the outside to give me a bit of leeway when piecing and trimming.

Then I traced the shape of each piece onto template plastic in permanent marker (including the seam allowances). I made the 2 outer pieces slightly bigger than I needed them to be so I could trim the finished blocks to the precise size. I also marked points along the curved edges of the templates to help match adjacent pieces later.
I used these templates to cut the fabrics. Because the curves are quite wide, it wasn’t too difficult to manoeuvre around the edges with the rotary cutter. Although let’s face it, the pieces weren’t perfect. I don’t use starch, so I was careful not to handle the pieces too much.
When it came to sewing the pieces together, I could take one of two approaches: create the circles and inset them into the two outer pieces, which had been sewn together; or sew each convex piece to its corresponding concave piece, and then join those two parts together along that wide quarter-circle seam. I opted for the latter. I’ve never sewn an inset circle before, and I didn’t want to start now!
Remember the points I marked along the curved edges of the templates? I pin my curves when sewing, so when I was ready to sew, I placed the plastic template over the curved piece again and put a pin where each of the marks was. Then I did the same with the second piece of fabric. I aligned the two pieces of fabric at these points and pinned them together (using one of the pins and removing the other one). Of course I should’ve taken photos so I could show this more clearly, but I never think of that when I’m in the middle of making. Oops!
Anyway, it didn’t take as long as it sounds. Remember, there are only 16 blocks, and only 3 seams per block. Not a lot of sewing, but a fair bit of planning and pinning!
Once I’d sewn the blocks, I pressed the seams open and trimmed the blocks. I have a 12.5″ square ruler, which is just the size I needed. Because I’d cut the outer pieces a little bigger than necessary (along their straight edges, not the curved edge), I had a bit of leeway when trimming the blocks. My curves are never perfect, so sometimes it’s nice to have a bit of wiggle room.
I used quilter’s tape to mark the places on the ruler where I needed things to line up: the edges of the circle, and at the edges of the block where the seam of the quarter-circle ends. It didn’t need to be super-precise, because there’s no points-matching between blocks, but I wanted the blocks to look as similar as possible. I’m sure if you measured them carefully now, you’d find some slight discrepancies, but nothing major (I hope!).

My 12.5″ ruler, marked up with quilter’s tape, laid on top of the templates. Straight pieces of tape mark the edges of the inner circle, while two curved strips mark the larger quarter-circle.
All that was left to do was join the blocks, then add the borders. Easy peasy!
Moonshot was quilted by Valerie Cooper of Sweet Gum Quilting. I ended up choosing a vertical wavy line quilting design. I faced the quilt using Cotton & Bourbon’s quilt facing tutorial.
I called the quilt ‘Moonshot’, because the shapes remind me of moons, and because the construction felt pretty ambitious (and almost impossible) at the start. But it all worked out: I managed to up my curve-sewing skills, and Moonshot was juried into QuiltCon – woo hoo! I’m excited to be part of the show and to have made it into this category!
Discover more from Geometriquilt
Subscribe to get the latest posts sent to your email.

Great explanation of your piecing method. Now do not be afraid of curves and go forth and piece more!
I enjoyed reading about your process. Beautiful result! It looks close to perfect to me. We always see our own inconsistencies but others done – it’s the impact of the end result that counts. Stunning!
This is a brilliant quilt, and your technical insights are precious! Thank you for sharing!
Chiara from Italy